Wednesday, November 28, 2007

Sparkly Flaky Friends


Wow! I never realized how hard it is to come up with a name for each post. As you can tell, I'm not very good at it. But I appreciate you taking a chance and reading the post anyway. lol

This card is going to be used for an upcoming class on heat embossing with a group that is fairly new to stamping, so I wanted to keep it kind of simple. I stamped Flaky Friends in Chocolate Chip on my Very Vanilla card base and then colored it in using chalks and a blender pen. I then used my Versamark pen on a few of the colored items and heat embossed it using Iridescent Ice. I used the Cerise DSP for the bottom half of the card and a strip of the reverse side for the faux ribbon strip. I used the corner rounder and then sponged the edges all the way around in red. For the sentiment I stamped it in Chocolate Chip and punched it out using the small tag punch, sponged the edges in Real Red and then used the Versamark pen and Iridescent Ice embossing powder. Then I layered it on Real Red punched out with the Large Tag Punch.

On another note, I have recently seen some beautiful cards using the SU! retired set Heavenly Peace and now I'm on a mission to obtain it. If you have it and would be willing to sell or trade, contact me at my email meredithcrary@yahoo.com.

Have a great day! Thanks for Stopping By!
Meredith

Monday, November 26, 2007

Way to Go!


Here is the long promised card using my new Gina K stamp set "Way To Go". I love this set! I created this bathroom scene using a piece of Jitterbug paper from Cosmo Cricket. I cut it to the size of my card base then cut it in half and used the pattern side for the wallpaper and used the plain side for the floor. I used a piece of Very Vanilla for the baseboard and for the card base. I created the floor using the wood technique found in the Technique Junkie Newsletter http://www.techniquejunkies.com/. I stamped the toilet and toilett paper image on Very Vanilla with Chocolate Chip ink and cut them both out. the toilet is adhered using stampin' dimensionals and the rug was a scrap of VV cut into an oval and then I used brown flocking on it. The toilet paper has white flocking on it and I colored the handles of it with my chalks and blender pen. The sentiment is stamped on VV and then layered on the Jitterbug paper (the same used on the floor) and then on Chocolate Chip. It's suppose to look like a picture hanging in the bathroom, but I don't know if it really comes across as that, also, the toilet paper looks like it's floating, if you have an ideas on making it look attached to the wall, I would love to hear them. Thanks for looking, I really enjoy all the comments that everyone is so kind to leave.

I mentioned the Technique Junkie Newsletter earlier in the post, I got the wood floor technique from the website, but I have yet to subscribe, though I am thinking about it. If you are a subscriber, I would like to know what you think about it and if you are a SU demo, has it helped you become a better stamper? Thanks for your input.

Have a great evening! TFL
Meredith

Sorry It's been so Long!

Sorry I haven't posted in a while, but with the holiday's I just haven't had the time. I did plan on posting my card made with my Gina K stamps today. I brought my camera to download the picture and post, but when I got to work I realized I forgot my port for my camera, so I'll post this evening after I get home. I hope everyone had a great Thanksgiving!

Monday, November 19, 2007

Time Well Spent


I was finally able to make time to stamp some this weekend. Which is good since I had new rubbah that had yet to see ink. I received my Time Well Spent stamp set on Thursday. It will be a level 3 hostess set in the new catalog, but SU! demonstrators received these early as a little thank you from SU! (pretty wonderful, huh, if you want more info on being an SU! demo so that you can get these kind of perks, contact me). I know this card is really simple, but I didn't have much time so I had to do something pretty quick. I stamped the big flower on Very Vanilla with black staz-on and then used a blender pen and ink pad to color it in (Purely Pomegrante, Groovy Guava, Soft Sky & Blue Bayou), I stamped the stem and leaves on VV with black staz-on and colored those in with the blender pen and Wild Wasabi and cut those out. The sentiment is stamped in black staz-on on Whisper White and I used the blender pens and inks to color it in also. I used Dazzling Diamonds on the flowers on the sentiment. The Blue Bayou cicle was cut out using an old CM template (gotta buy the coluzzle) and I stamped the small flowers in Blue Bayou also and used my white gel pen to hit the centers. Then I used my paper piercing kit and white gel pen to add faux stitching on the circle. Also the center of the large flower is covered in crystal effects (I love this stuff) and I used my corner rounder on the corners. I hope everyone had a great weekend! I've got a card using my new Gina K Way to Go set, but I have a small repair to make on it after my DS got hold of it. So I will post it in the next day or two. TFL Have a great one!!

Thursday, November 15, 2007

A Little Thank You


Hi everyone! I haven't had a chance to get in my stamp room with a workshop on Tuesday (Hi Dana, thanks for hosting a great workshop, I look forward to stamping with you soon) and cleaning house last night. Hopefully, I'll get the chance to work on some new stuff tonight (it feels like its been forever) and finally get some ink on my new Gina K Stamps (woo hoo). But in the meantime, here's a quick thank you note that I did with a 3x3 card from the love notes promotion a couple of months ago. I was going with very simple so that it could be easily mass produced to use in customer's orders. I used the 3x3 textured Wild Wasabi cs, Purely Pomegranate cs punched with the spiral punch, a thank you from Much Appreciated stamped in Wild Wasabi on Very Vanilla cs and the small flower from Priceless in WW as a background stamp, I used my white gel pen for the centers. TFL Have a great day!!

Tuesday, November 13, 2007

Update:

I wanted to let you know that I have received an update on the little boy that I wrote about earlier today. They are expecting him to live, but he will be in ICU for the rest of the week and then moved to a regular room for about two more weeks. Please remember him and his family in your prayers as they are not only dealing with his injuries but also the death of his grandmother.

Christmas Project: Paint Can


I promised more Christmas projects so here's a paint can that I just recently finished. I used the Dashing DSP to cover it and Real Red Ribbon grosgrain around the top and middle. The ribbon on the handles is Very Vanilla Taffeta, Real Red Grograin and Very Vanilla and Old Olive "stretchy" ribbon from the Theatre Ribbon Origianls pack. I used old CM templates for the circles and ovals on the top. I distressed the oval with the polka dots and sponged in Real Red around the edges. The "Merry Christmas" is from the Holiday & Wishes stamp set. I stamped it first in Old Olive than offset it just a bit and stamped it in Real Red and then sponged the edges in Real Red. The flower and ivory half pearl are from the pretties kit. I "smooshed" the flower on the Real Red ink pad to dye it. The paint can came from The Flower Factory in Dayton, OH on one of our many trips up there (it's where my husband is from). My plans are to use this to put a Christmas gift inside.

On a serious note: A young boy that attends the summer camp that I help run was attacked this weekend while staying with his grandma. Someone broke into the house killed the grandma and stabbed him multiple times, leaving him for dead. He was able to call his mother to get help. Last I heard, he was in critical condition and undergoing surgery. He is a very sweet young man with a tender heart and wants to be a minister when he grows up. Please remember him and his family in your prayers.

Remember today to hug your loved ones and let them know how much you love them because you never know what the day will bring.

Saturday, November 10, 2007

Relaxing Weekend


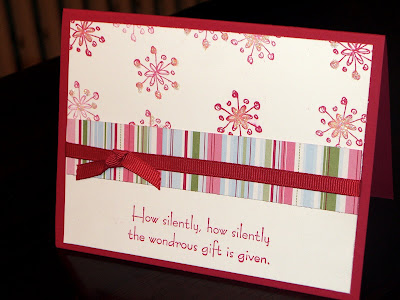
I hope everyone is having a great weekend! Mine has been pretty relaxing, which is exactly what I needed. I spent a little time cleaning yesterday and today I got to go shopping with my best friend. She lives almost an hour away so we don't get to do this very often. We always have a great time together, she gets my humor. I have also been able to work in my stamping room, but its mostly been on stuff for my upcoming workshop, so I thought I would share one of the make-n-takes for the workshop. This is a pretty easy card since the workshop will be all brand new stampers. I used SU's Wonderous Gift, Winter Brights SS Kit for the strip of DSP. I stamped the snowflakes in Real Red and added Dazzling Diamonds to them. The ribbon is the Real Red grosgain.

Sisterhood of the Blogging Stampers Note: I'm still in the process of adding names to my blog roll so please don't feel slighted if your name is not on my roll yet, it will be soon.

Thanks for looking. Have a great weekend!

Thursday, November 8, 2007

So Easy!!


Here's another Christmas project. These coasters are very easy to make and so economical, which is great if you're on a tight budget like me, and they are a WOW gift. Every time I show this to my friends they are impressed (I don't tell them how easy it is). I used the Sanded BG in Black Staz-on and stamped it off once before stamping it on the tile. I also stamped the lighthouse image from the retired SU set Calm seas in black staz-on. Then I used daubers and red, blue, green & brown staz-on to add color. I used brown & green around the edges. I added small felt circles on the bottom (got them at Lowes) so I wouldn't have to worry about it scratching the furniture. Then I started using it (didn't seal it or bake it) and the color has stayed on without a problem. I've been making quite a few of these since they are so easy, so you'll probably see more of them in the future. I hope you all have a great day! Thanks for stopping by!

ETA: I got the coasters from Lowes for at $ .33 each.

Tag You're It!

I've been tagged! I was so excited when I found out I had been tagged (I'm such a dork), but I feel like I have finally been initiated into the blogging world. I was tagged by Carla, who has such wonderful creations on her blog (check it out) and has been leaving me encouraging comments as I start this blog. Thanks Carla!

1. If you could have 100.00 worth of scrapbook paper or assorted embellishments, which would you choose?

That's a hard one, can't I have both? If not I guess I would take the paper (still trying to build my collection)

2. If you had to choose between using only stamps or ribbons, which would you choose?

Stamps! There is so much you can express with just a stamp.

3. If you knew how to do both awesome cards and layouts but could only do one for a whole year…which would you do?

Definitely cards...I rarely do layouts.

4. Would you rather own a scrap booking store or have your own scrapping room at home…(can’t have both he he he).

I have my own scrapping room, but if I could just make it bigger. I'm running out of places to put stuff! lol

5. What is your CURRENT card making or scrapping style?

One day I may be shabby chic and the next day clean classic and the next day who knows. I like to try it all!

Here are the rules…………..

Please answer the questions on your blog and tag 5 more people to answer the same questions……….make sure you list on your blog who you are tagging….Thanks!!

Now I'm suppose to tag 5 people, but 4 is all I have

1. Laura
2. Alana
3. Gina
4. Stacy

Wednesday, November 7, 2007

Be Merry


I've finished most of my Christmas cards (I'll be posting those later on) so I've started working on other Christmas projects. I've seen lots of these chipboard coasters with binder clips so I decided to try making one. It was soooo easy. I used a chipboard coaster from Outback (where my wonderful hubby took me to dinner last night) and covered it with SU's Dashing DSP then added a Real Red cs mat. On the real red I stamped "be merry" from warm words in white craft ink and used my white gel pen to doodle around the edges. I used green grosgrain ribbon (not SU) on the corners. I covered the binder clip in the Dashing DSP also. All in all it took about 10 minutes and that included also covering a bigger sized binder clip to see which one was the best to use.

Sisterhood of the Blogging Stampers!

As part of the new Sisterhood of the Blogging Stampers I am suppose to list a "get to know you" fact. So here goes. I am 31 and a year and half ago I married my soul mate and we now have a blended family of 4 kids, which has made life pretty exciting. I first got into stamping about 10 years ago, but shortly after that became a single mom which made it hard to find time to stamp. So after getting married again, I decided to take up stamping again in January of 2007 and became an SU demo in February. So that's about it to start off with. I can't wait to get to know my new sisters in the Sisterhood of Blogging Stampers!

Tuesday, November 6, 2007

It's a Card, No It's a Purse, No It's A Purse Card


Here's the pocketbook card that I made for my niece's 8th birthday. I am so proud of this. I used Cosmo Cricket designer paper, Purely Pomegranet double stitched ribbon and my corner rounder with the guard removed for the scallops on the flap of the purse. For the closure I used velcro circles and the "button" on the outside is a 1/2" cirlce punch of the paper I used for the base of the pocketbook and covered it with one of the "bubble" from SU's new build-a-brads. On the inside I attached the little sleeve that her gift card came in with red stick tape. I've heard that she loved the card and actually put her birthday money in the gift card sleeve inside the card and has been carrying it as her purse. It is so worth it to take the time to make my own cards. Tomorrow I have some non-card projects to share.

Monday, November 5, 2007

Stampin' UP! Pretty Papers


Stock up for all your upcoming projects with Stampin' UP!'s exclusive double-sided Designer Series paper. We've got so many pretty patterned papers to choose from, you're sure to find the perfect patterns to help you show off your unique crafting style. And the best part is, you'll get a FREE pack of Designer Series paper ($9.95 value) for every three packs you buy-no limits, no restrictions!

See pages 170-173 of our Fall-Winter Collection 2007 or our Holiday Mini Collection to see all our Designer Series paper. Or visit us on the web at www.stampinup.com for free fall Designer Series paper project ideas, and start picking your patterns today!

Contact me at meredithcrary@yahoo.com to order your pretty papers today!

Thursday, November 1, 2007

Birthday Card


Tonight I had the house to myself so I used the quiet time to make cards for my niece and daughter's birthdays this weekend. This card is for my daughter Taylor who will be 14 on Saturday and has no stamping on it. I used Chocolate Chip CS, Old Olive CS and SEI's Aunt Gerti's Garden. The focal point is a Twill Sticker that already had all these designs on it by EK Success ( I got it on clearance at Hobby Lobby and I think it's so adorable) and I sponged Old Olive on the edges to help tie it in with the paper. The button is one from my stash and its tied with some linen thread. It's not often that I make a card without stamping, but I'm really pleased with how this one turned out. Tomorrow I'll share the one I made for my niece's birthday.

I Finally Did It!!


I finally ordered a stamp set from somewhere other than Stampin' Up! I'm a Stampin' Up! demonstrator and I fully believe in supporting my own business, but the new Gina K "Way to Go" stamp set was so cute and so my style, I just couldn't resist. You can order it at www.ginakdesigns.com. I can't wait for it to get here! Sorry still no pics, but hopefully I'll get some made tonight so I can get them posted.